Designing 2D Materials

image-description
Designing 2D Materials
  • Age: 11+
  • Time: 120
  • (Setup: 15 min, Activity: 90 min including chilling time, Cleanup: 15 min)
  • Materials: $10

Did you know that scientists can design and build very thin (two-dimensional or “2D”) materials that are only one to a few atoms thick? These materials have special properties because they’re so thin. In this mission, you’ll use fun foods to build a model of a 2D material to explore some of the same features that scientists observe in microscopes. Then, your challenge will be to use what you’ve learned to design, build, and test a brand new material for a particular task -- so get ready to think like a materials scientist!

Download PDF
  • what you need
    What you Need

    Materials:

    • 1 6-oz. package of Jell-O or other gelatin dessert (any flavor)
    • 2 cups hot water
    • 2 cups cold water
    • 7 coated paper plates (or more for additional experimentation)
    • Uncooked rice
    • Chunky cereal (like Chex or similar size and texture)
    • Milk (about 1 cup)

    Equipment:

    • 2-cup liquid measuring cup
    • Mixing bowl
    • Spoon for mixing
    • Table knife
    • Baking tray with raised edges
    • Small paper cup (or other easy-to-pour container)
    • Pen or marker
    • Paper
    • Optional: Smartphone or camera for recording video
  • What To Do
    What To Do

    Initial Set-up:

    1. Let’s start building models of some 2D materials! With help from an adult, prepare the gelatin in a mixing bowl with hot and cold water according to the package instructions. Stir carefully to avoid making bubbles.

    2. Prepare space in the refrigerator for 4 plates to each lay flat on a shelf. Spoon a little bit of the gelatin onto each plate—just enough to cover the bottom of the plate, making sure it spreads out evenly into a thin, smooth surface. Add slowly to avoid bubbles. Set aside any leftover liquid gelatin; don’t throw it away or chill it yet!

    3. Build your first model material:
      • Model #1: Allow one plate to chill untouched. Model #1 represents a 2D material with a perfectly smooth structure.

    4. For the next three models, we’re going to change up this perfect structure by adding what scientists call “defects.” In real materials, defects in their structure change their properties and behaviors.
      • Model #2: Randomly sprinkle uncooked rice onto the gelatin, enough to create a slightly rough or uneven surface. The rice in Model #2 represents tiny defects.

      • Model #3: Randomly scatter cereal pieces around the gelatin. The cereal in Model #3 represents large defects.

      • Model #4: Leave the final plate untouched for now. After it is completely chilled, use a table knife to carefully cut or “draw” long lines through the gelatin in different directions. These cuts in Model #4 represent another type of defect called “grain boundaries.” When scientists “grow” real materials, the building process of placing atoms often starts in several different locations at the same time. These boundaries form when the different sections come together.
    5. Chill the plates in the refrigerator until the gelatin solidifies (about 30 minutes). Take the plates out and put them in your work area (preferably near a sink). Don’t forget to finish Model #4! You now have four different 2D material models to experiment with and observe how they affect the flow behavior of milk.

    Experiment with your model 2D materials:

    1. Ready to observe the properties of your models? To do so, you’ll watch how a little bit of milk travels down and across each plate. In this model, milk represents a “property” of the material, like electricity or heat. The flow of the milk represents how this material property “behaves.” (Optional: Ask a partner to record a video as the milk flows across each model so you can compare the milk’s behavior more carefully later!)

    2. Fill a small cup or container with milk for easy pouring control. If using a paper cup, pinch the rim to make a spout.

    3. Let’s start with Model #1, the perfectly smooth plate of gelatin. Prop up one edge of the plate on the side of your baking tray. Notice where the edge of the plate is highest; this will be your starting point for pouring milk. The baking tray will catch the milk at the bottom.

    4. Slowly pour the milk from the starting point as you watch and/or record video. What do you observe? How does the milk flow down—fast or slow? Does it travel in a straight line or spread out randomly? Where does the milk first reach another edge of the plate?

    5. Repeat steps 8-9 with your other three models, pouring milk onto the starting point of each plate. How do rice, cereal, or cuts in the surface each change the flow of the milk? In real materials, the type of defect, how many defects there are, and their location in the main material determines the behavior of a particular property. For example, defects might act as a speed bump or even completely change the direction of the flow.

    Design challenge with model 2D materials:

    1. Now that you’ve modeled how different 2D materials behave, you’re ready to design a new material! Sometimes defects occur naturally, but scientists often purposely place defects into materials to achieve desired property behaviors. The process of building new materials is called “fabrication.” Like building with atomic-sized Legos, scientists use special tools to fabricate new materials, almost atom by atom.

    2. Take your remaining three plates, and mark point “A” anywhere on the edge. Point A will be your starting point. Then mark point “B” about a third of the way around the edge of each plate.
      • Your challenge: Can you design a 2D material - using combinations of tiny defects, large defects, and grain boundaries - that will direct your milk from point A to point B?

      • Based on your earlier observations of the milk’s behavior, sketch your plans for three different designs on a plain sheet of paper.

    3. Time for fabrication! Use the remaining liquid gelatin that was set aside in Step 4 to make three fresh plates of gelatin. Based on your plans, add your defects either before or after cooling.

    4. Once your new models are solidified, it’s time to put them to the test! Prop up each plate under Point A. Slowly pour a little milk at Point A. Does it successfully flow to Point B? Which of your designs worked best?

    5. Explore further! Can you think of other ways to design the model to control flow? Look for other foods that could create different types of defects in the gelatin, or try making tiny holes in the gelatin with a straw. Predict and test what will happen in each model!

    Clean-up:

    The food ingredients in this activity are safe to eat, but they may not taste good together. Pour the milk into the sink and dispose of your experimental gelatin surfaces in the trash. Chill any leftover gelatin for a snack!

  • What's Happening?
    What's Happening?

    The structure of materials affects how they behave. Since 2D materials have no measurable height, their characteristics are unique because behaviors are limited to just two directions - their width and length. In the models you created, you changed the structure of the thin gelatin by adding defects, causing different flow patterns of milk. Similarly, at a microscopic level, the arrangement of atoms within a 2D material can affect how electricity or heat flows. Even adding just a one-atom defect to a hundred million atoms of the original material can make a difference!


    And just like your design challenge, scientists purposefully design thin surfaces or layers of materials using different defects and building techniques (often requiring multiple steps) to control the behavior of certain properties. Some of these building techniques include removing atoms to create holes, adding different kinds of atoms here and there to the overall material, and creating boundaries by shifting the positions of atoms to form edges between different areas of the material.

  • So What?
    image-description

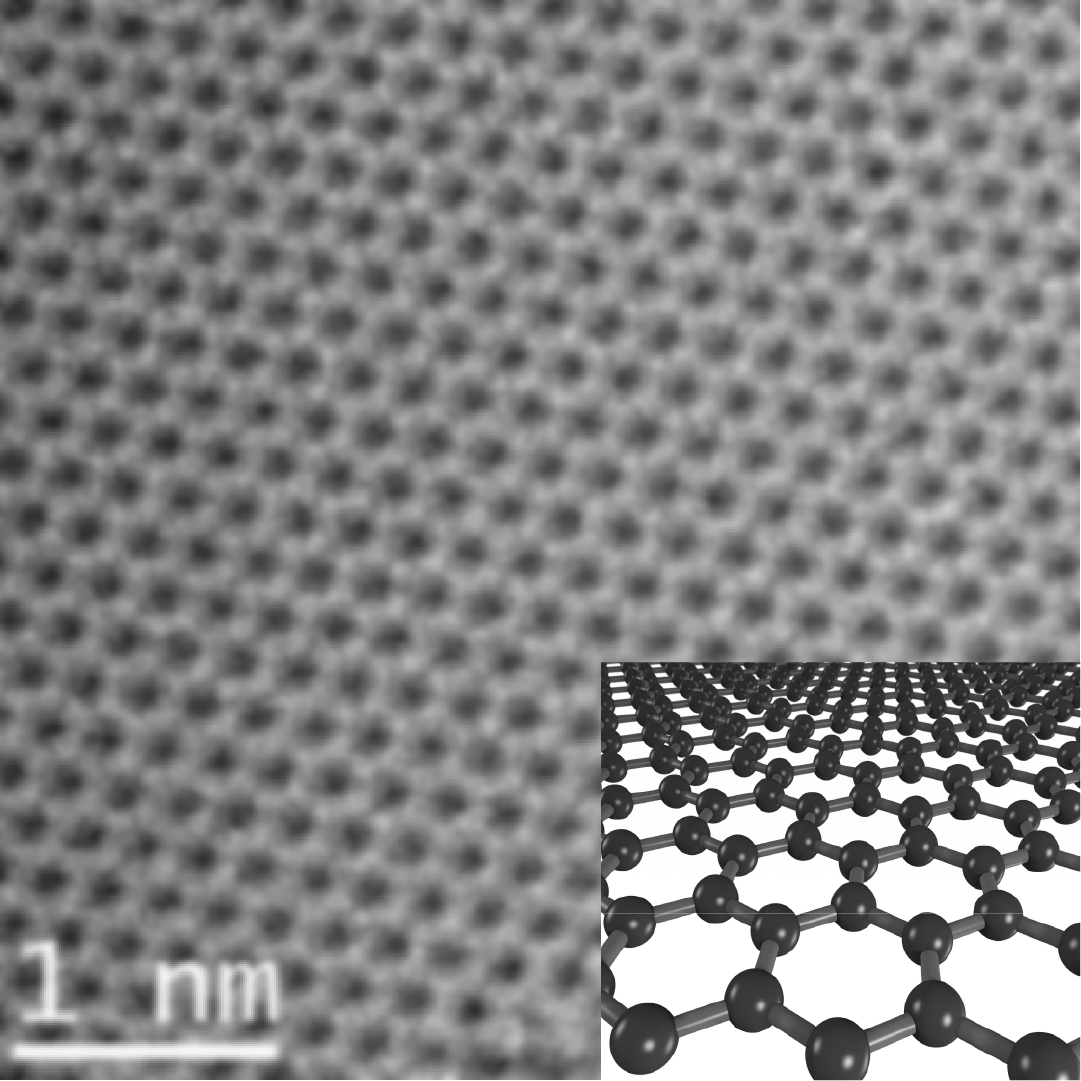
    Image credit: Saiphaneendra Bachu/Penn State; Diagram by Martin McCarthy/NISE Network

    So What?

    Many scientists are working with materials that are made of one or just a few layers of atoms. One example of a common 2D material is graphene, which is made of a single layer of carbon atoms. Even though carbon is plentiful on Earth, graphene is special. Its carbon atoms are arranged in a hexagonal pattern, like chicken wire or a honeycomb. Graphene is extremely strong but very lightweight, anti-bacterial, flexible, see-through, and an effective heat transmitter. It’s also a superhighway for electricity, enabling electrons to move through it very quickly. Scientists are experimenting with adding different types of defects to the hexagonal pattern in order to use graphene for solar cells, LEDs, sensors, energy storage, and other electronic devices. Scientists are also stacking layers of different 2D materials on top of each other to see how these thicker materials might have even more interesting and potentially useful properties.

  • Scientists In Action
    image-description
    Scientists in Action

    How do scientists design new materials that could revolutionize the next generation of electronics? Join Antonio Marston and Michael Cruse for a look into their lab as they blaze new trails in the world of super-thin 2D materials.

  • For Teachers
    For Teachers

    Below are suggested alignment between this activity and concepts in the Next Generation Science Standards.


    Performance Expectations

    • 2-PS1-2: Analyze data obtained from testing different materials to determine which materials have the properties that are best suited for an intended purpose.

    • MS-PS1-1: Develop models to describe the atomic composition of simple molecules and extended structures.

    Disciplinary Core Ideas:

    PS1.A: Structure and Properties of Matter

    2nd Grade

    • Different properties are suited to different purposes.

    5th Grade

    • Matter of any type can be subdivided into particles that are too small to see, but even then the matter still exists and can be detected by other means.

    Middle School

    • Substances are made from different types of atoms, which combine with one another in various ways. Atoms form molecules that range in size from two to thousands of atoms.

    • Solids may be formed from molecules, or they may be extended structures with repeating subunits (e.g., crystals).

    Please click on the PDF below for a more detailed description of how this activity ties to NGSS

    Download PDF